Is the MPU6050 Still Worth It? Our Review
The MPU6050 is absolutely still worth it. You will find the MPU-6050 sensor is perfect for a hobbyist project. The MPU-6050 is the wrong sensor for high-performance needs. The popular MPU-6050 sensor presents a clear choice for your project.
⚖️ The Trade-Off: You must weigh the MPU-6050 sensor's unbeatable low cost against its technical limits. The MPU6050 sensor has known issues like noise and drift. This guide helps you evaluate if the MPU-6050 is the right sensor for you. The MPU6050 is a capable sensor. The MPU-6050 is a classic sensor.
Key Takeaways
- The MPU6050 sensor is great for hobby projects because it costs little money.
- Many people use the MPU6050, so you can find lots of help and guides online.
- The MPU6050 measures movement in six ways, but it can have problems like noise and drift.
- Newer sensors are better for projects that need very exact movement tracking.
- Always check if your MPU6050 sensor is real to avoid problems with fake parts.
THE PROS: WHY CHOOSE THE MPU6050
The MPU6050 remains a top choice for many projects for several compelling reasons. You will find its blend of low cost, strong community backing, and solid technical features makes it an ideal starting point. This motion sensor provides a fantastic entry into the world of orientation and movement tracking. Let's explore why the MPU-6050 might be the perfect sensor for you.
UNBEATABLE COST-EFFECTIVENESS
Your project budget is often a primary concern. This is where the MPU-6050 truly shines. You can purchase a complete breakout board, like the popular GY-521, for just a few dollars. This price point makes the mpu6050 sensor incredibly accessible. You can experiment, make mistakes, and even burn out a sensor without a major financial loss.
Modern alternatives with more advanced features come at a much higher cost. You can see the significant price difference for yourself.
| Module Type | Typical Price |
|---|---|
| MPU6050 (GY-521) | $4.00 |
| MPU6050 (GY-6050) | $3.00 |
| BNO055 (Adafruit 9-DOF) | $35.00 |
For the price of one advanced sensor, you could buy a handful of MPU-6050 modules. This cost-effectiveness makes the mpu6050 an unbeatable option for students, hobbyists, and anyone prototyping on a tight budget.
MASSIVE COMMUNITY AND LIBRARY SUPPORT
When you choose the MPU-6050, you are not just buying a piece of hardware. You are gaining access to over a decade of community knowledge. Countless tutorials, forum posts, and project examples are available to guide you.
💡 Your Secret Weapon: The DMP The MPU6050 contains a powerful Digital Motion Processor (DMP). This is a small processor inside the sensor itself. The DMP handles the complex math needed to combine the mpu-6050 accelerometer and mpu-6050 gyroscope data. It uses advanced algorithms like Kalman filtering to give you stable mpu6050 motion tracking data. This feature offloads work from your main microcontroller and greatly simplifies your code.
This massive support system includes pre-written libraries that make programming the mpu6050 sensor incredibly simple.
-
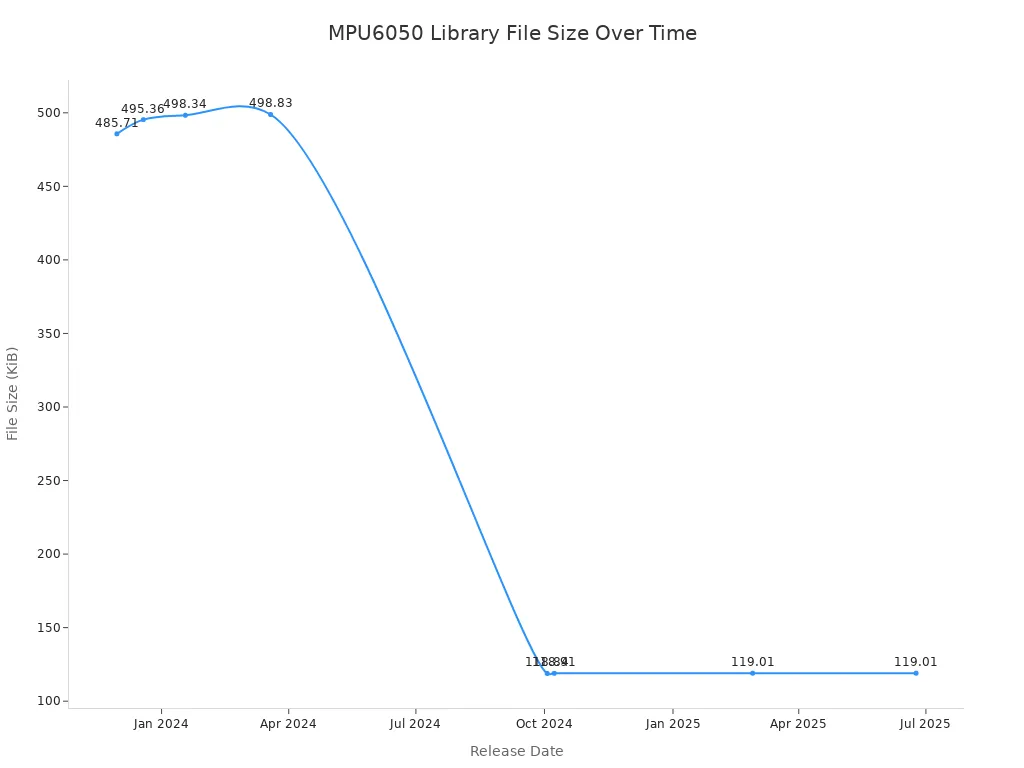
For Arduino: You can find excellent libraries like the one from Electronic Cats directly in the Arduino Library Manager. It is well-maintained and supports a wide range of boards, including Arduino UNO, ESP32, and ESP8266. The consistent updates show the library is actively developed.
-
For Raspberry Pi: You have numerous options for getting your mpu-6050 sensor running. You can find complete Python tutorials that walk you through connecting the sensor and reading data. There are also C++ libraries available if you need higher performance for your mpu6050 motion tracking project. These resources provide example code to help you start your mpu6050 motion tracking project quickly.
This vast ecosystem of support means you will spend less time troubleshooting and more time building your project.
TECHNICAL SPECS OF THE MPU6050 SENSOR
Despite its age, the technical capabilities of the mpu-6050 sensor are impressive for its price. The mpu-6050 is a 6-Degrees-of-Freedom (6-DoF) motion sensor. This means it contains two types of sensors in one chip: a 3-axis mpu-6050 accelerometer and a 3-axis mpu-6050 gyroscope.
The mpu-6050 accelerometer measures linear acceleration, which you can use to detect gravity and orientation. The gyroscope measures angular velocity, which helps you track how fast the sensor is rotating. You can digitally program the measurement range for each sensor to fit your project's needs.
| Sensor Type | Full-Scale Range |
|---|---|
| Gyroscope | ±250, ±500, ±1000, and ±2000 °/sec (dps) |
| Accelerometer | ±2g, ±4g, ±8g, and ±16g |
The mpu6050 uses on-chip 16-bit Analog-to-Digital Converters (ADCs) for both the mpu-6050 accelerometer and gyroscope.
What does 16-bit resolution mean?
It means the sensor can measure 2^16 = 65,536 distinct levels for any given range.
For the ±2g range, this gives you incredible sensitivity.
For the ±16g range, you can measure much larger forces, but with less sensitivity.
This high resolution from the mpu-6050 accelerometer provides more than enough accuracy for common hobbyist applications like gesture controllers, self-balancing robots, and orientation displays. The mpu6050 sensor is also very power-efficient. It uses about 3.9mA during normal operation. You can also put the mpu6050 into a sleep mode that uses a tiny 5µA of current, making it suitable for battery-powered projects. The mpu-6050 sensor packs a lot of capability into a small, affordable package.
THE CONS: WHEN TO AVOID THE MPU-6050
The mpu6050 is a great starting point, but you must understand its limitations. Certain projects demand more precision than this budget-friendly sensor can offer. You should know when to choose a more advanced sensor for better results. The mpu-6050 has known issues that can impact your project's reliability.
PERFORMANCE OF THE MPU-6050 SENSOR
You will quickly encounter two main performance issues with the mpu-6050 sensor: noise and drift. Noise makes your sensor readings jumpy and inconsistent. Gyroscope drift is a more serious problem. It causes the sensor to slowly lose its sense of direction over time.
🤖 Practical Example: Imagine you build a self-balancing robot using a mpu-6050. Due to drift, the robot might hold its balance perfectly for a minute. Then, it will slowly start to think "level" is a slight tilt. Eventually, it will tip over. The mpu-6050 accelerometer data can also be noisy.
You can fight these issues with software. Proper mpu6050 calibration is your first step to get clean sensor readings. After mpu6050 calibration, you can apply filtering techniques.
- A complementary filter combines the mpu-6050 accelerometer and gyroscope data. This method gives you responsive and accurate
sensor readingswith low noise. - Kalman filtering is a more advanced
mpu6050 filteringtechnique. It reduces errors when you processmpu6050 datato calculate movement. You need regular, fixed-rate sampling for this to work well.
These methods improve the mpu6050 data, but they add complexity to your code and cannot completely eliminate drift from the mpu-6050 sensor. The mpu6050 sensor requires careful mpu6050 calibration for usable sensor readings.
AGE AND MODERN ALTERNATIVES
The original mpu-6050 chip from InvenSense is no longer in production. The market is now filled with clones and recycled parts. While these work, technology has moved forward. Modern sensors offer superior performance and features that the mpu6050 lacks. A newer sensor can provide much cleaner sensor readings.
For example, many new sensors are 9-axis, not 6-axis like the mpu-6050. They add a magnetometer to the mpu-6050 accelerometer and gyroscope. This third sensor acts like a compass, giving the sensor a fixed reference point—Earth's magnetic field. This feature helps you fight drift effectively. You can see the key differences for yourself.
| Feature/Sensor Type | 6-axis MPU6050 (Accelerometer + Gyroscope) | 9-axis BNO055 (Accelerometer + Gyroscope + Magnetometer) |
|---|---|---|
| Reference Point | Lacks a fixed external reference | Uses Earth's magnetic field as a fixed reference |
| Drift Compensation | Prone to gradual drift in heading over time | Compensates for drift over long periods |
| Orientation Data | Provides relative changes in orientation | Delivers absolute orientation (yaw, pitch, roll) |
If your project needs to know its absolute direction (like a drone following a compass heading), the mpu6050 is the wrong choice. You should invest in a modern 9-axis sensor like the BNO055 or ICM-20948. This type of sensor will give you more reliable sensor readings.
RISK OF COUNTERFEIT CHIPS
Because the official mpu-6050 is discontinued, you face a high risk of buying a counterfeit mpu6050 sensor. These fake modules often use a different, lower-quality chip but are sold as a genuine mpu-6050. You may find that your counterfeit mpu6050 sensor simply does not work. Users report that many fake modules fail to initialize or produce "absolutely useless" sensor readings.
Luckily, you can check if your mpu-6050 sensor is authentic. Every mpu-6050 has an internal register called WHO_AM_I. You can read this register with your microcontroller.
- The register is at I2C address
0x75. - A genuine mpu-6050 will return the value
0x68. - A common counterfeit chip often returns
0x98or0x72.
You can run a simple check as part of your initial mpu6050 calibration routine. This code helps you verify the identity of your mpu-6050 sensor.
#include <Wire.h>
#define MPU6050_I2C_ADDRESS 0x68
#define MPU6050_WHO_AM_I 0x75

void setup() {
  Wire.begin();
  Serial.begin(9600);

  // Read the WHO_AM_I register
  Wire.beginTransmission(MPU6050_I2C_ADDRESS);
  Wire.write(MPU6050_WHO_AM_I);
  Wire.endTransmission(false);
  Wire.requestFrom(MPU6050_I2C_ADDRESS, 1, true);
  uint8_t whoAmI = Wire.read();

  Serial.print("Device WHO_AM_I reports as: 0x");
  Serial.println(whoAmI, HEX);
}

void loop() {
  // Your main code here
}
This simple test saves you hours of frustration. It confirms you have a real mpu-6050 before you start coding your project. A bad sensor will give you bad mpu6050 data. A good mpu6050 sensor with proper mpu6050 calibration will provide better sensor readings from the mpu-6050 accelerometer.
TOP BOARDS FOR YOUR MPU6050 PROJECT
You will not buy the mpu6050 chip by itself. You will buy it on a breakout board. This small circuit board makes the sensor easy to use. It includes the extra parts you need to connect the sensor to your microcontroller, like an Arduino or an esp32 board. The board you choose can make your project easier or harder. Let's look at the best options for your mpu6050 project.
BEST FOR BEGINNERS: THE GY-521
You will almost certainly encounter the GY-521 board first. It is the most common and affordable way to use the mpu-6050 sensor. Its low price makes it perfect for learning without worrying about breaking expensive hardware. The board is simple and has everything you need to get started.
You can connect the GY-521 to your microcontroller using the I2C communication protocol. The board has clearly labeled pins for this purpose.
| Pin | Function |
|---|---|
| VCC | Power supply (can be 5V or 3.3V due to onboard voltage regulator) |
| GND | Ground |
| SCL | I2C Serial Clock Line |
| SDA | I2C Serial Data Line |
| XDA | Auxiliary Data (rarely used) |
| XCL | Auxiliary Clock (rarely used) |
| AD0 | I2C address selection (low for 0x68, high for 0x69) |
| INT | Interrupt digital output |
Once you master the basics, you can try more exciting things. You can use the mpu-6050 for:
- Simple motion detection alarms
- Gesture-controlled robots or games
- Fitness trackers that count steps
- Stabilizing systems for small drones
BEST FOR INTEGRATION: ADAFRUIT BOARDS
If you want a more reliable and user-friendly experience, you should consider a board from Adafruit. Adafruit makes a high-quality PCB for the mpu6050 called the Adafruit MPU-6050 6-DoF Accel and Gyro Sensor. This board is fully assembled and tested, which gives you peace of mind.
The biggest advantage of the Adafruit board is its modern connectors.
- It includes STEMMA QT connectors on both sides. These are small, locking plugs that let you connect the sensor without any soldering.
- You can easily chain multiple sensors together. This makes prototyping with an esp32 board or other microcontrollers incredibly fast.
Adafruit also provides excellent software support. They offer their own CircuitPython/Python and Arduino libraries. These libraries are well-documented and make it easy to get motion measurements from the sensor. Using an Adafruit board for an esp32 with mpu-6050 setup is a very smooth process. The combination of a powerful esp32 board and a reliable mpu6050 sensor is perfect for more advanced builds.
KEY BOARD FEATURES TO CHECK
When you choose a breakout board for the mpu-6050, you should check for a few key features. These details determine how easy the sensor will be to use with your specific setup, such as an esp32 with mpu-6050 system.
-
Onboard Voltage Regulator: The mpu-6050 chip itself runs on 3.3V. Many popular microcontrollers, like the Arduino Uno, use 5V logic. A good breakout board includes a voltage regulator. This small chip takes a 5V input and safely steps it down to the 3.3V the sensor needs. This feature makes the board compatible with both 3.3V systems (like an esp32 board) and 5V systems.
-
I2C Pull-Up Resistors: The I2C communication protocol requires pull-up resistors on the SDA and SCL lines to work correctly. Most good mpu6050 boards include these resistors. If your board lacks them, you may get errors or no sensor readings at all. You would then need to add them yourself on a breadboard. Checking for included resistors saves you a potential headache, especially when connecting an
esp32 with mpu-6050. -
AD0 Pin Access: The AD0 pin lets you change the I2C address of the sensor. This is extremely useful if you want to use two mpu6050 sensors in the same project. By connecting the AD0 pin on one sensor to VCC, you change its address from
0x68to0x69. This allows your esp32 board to talk to both sensors without conflict. Anesp32 with mpu-6050configuration benefits greatly from this flexibility. A qualityesp32 boardcan handle multiple I2C devices. This feature is vital for getting cleansensor readingsfrom multiple sources. Anesp32 boardwith a good sensor makes a powerful combination.
The mpu6050 is a fantastic tool for learning. The mpu-6050 is a poor choice for precision. You must choose the right sensor for your project. The mpu6050 sensor is a good sensor. The mpu-6050 is a fine sensor. The mpu6050 sensor is a capable sensor. The mpu-6050 is a classic sensor. The mpu6050 sensor is a budget sensor. The mpu-6050 is a simple sensor. The mpu6050 sensor is a useful sensor. The mpu6050 sensor is a great sensor.
Your Decision Guide:
- Choose the mpu-6050: for a basic tilt project where cost is your main concern. The mpu-6050 is a good sensor.
- Choose a BNO055: for demanding tasks needing stable, built-in orientation fusion. This sensor is better.
Now you can confidently choose the right sensor. The mpu6050 is a good sensor. The mpu-6050 is a good sensor. The mpu-6050 is a good sensor.
FAQ
### What voltage should I use for the MPU6050?
💡 You can power most MPU6050 breakout boards, like the GY-521, with either 3.3V or 5V. These boards have a built-in voltage regulator. This feature safely converts 5V down to the 3.3V the sensor chip needs. Always check your specific board's documentation first.
### Can I use two MPU6050 sensors on one Arduino?
Yes, you can use two sensors. You must change the I2C address of one sensor. You do this by connecting the AD0 pin on one board to VCC (3.3V). This changes its address from the default 0x68 to 0x69, letting your microcontroller talk to both.
### What does 6-DoF mean?
❓ 6-DoF stands for Six Degrees of Freedom. It means the sensor measures motion in six different ways. The MPU6050 has a 3-axis accelerometer for linear motion and a 3-axis gyroscope for rotational motion. This gives you a complete picture of the sensor's movement.
### Is the MPU6050 the same as the GY-521?
No, they are different. The MPU6050 is the actual sensor chip. The GY-521 is the name of the popular breakout board that contains the MPU6050 chip. The board adds the necessary components, like a voltage regulator and pull-up resistors, making the sensor easy for you to use.